
How to Remove Gel Polish Safely at Home
Gel polish offers a beautiful, long-lasting finish that can keep your nails looking salon-fresh for weeks. However, when it’s time for a change or a break, removing it properly is crucial to maintaining healthy, strong nails. While professional removal at a salon is always an option, you can safely remove gel polish at home with the right technique and materials.
Why Proper Removal Matters
Many people make the mistake of peeling or picking at their gel polish, which can cause significant damage to the nail bed. This can lead to thin, brittle nails that are prone to breakage and peeling. Taking the time to remove gel polish correctly ensures your natural nails stay healthy and strong for your next manicure.
What You’ll Need
Before starting the removal process, gather these supplies:
- Acetone (100% pure acetone, not nail polish remover)
- Aluminum foil (cut into small squares)
- Cotton pads or rounds
- A nail file (preferably 180-220 grit)
- A cuticle pusher or orange stick
- Cuticle oil or hand cream
- A bowl of warm water
- Petroleum jelly or barrier cream
The quality of your acetone matters. Regular nail polish remover contains water and other ingredients that won’t effectively break down gel polish. Pure acetone is essential for safe and efficient removal.
Step-by-Step Removal Process
Step 1: File the Top Layer
Start by gently filing the shiny top layer of your gel polish. This helps acetone penetrate the polish more effectively. Use light, gentle strokes and be careful not to file your natural nail. You only need to dull the surface—this shouldn’t take more than a minute per nail.
Step 2: Protect Your Skin
Apply petroleum jelly or a protective barrier cream around your cuticles and the skin surrounding your nails. This prevents acetone from drying out your skin, which can cause irritation and peeling.
Step 3: Soak the Cotton Pads
Saturate cotton pads or rounds with 100% pure acetone. You need enough acetone to fully wet the pad so it can work on the gel polish.
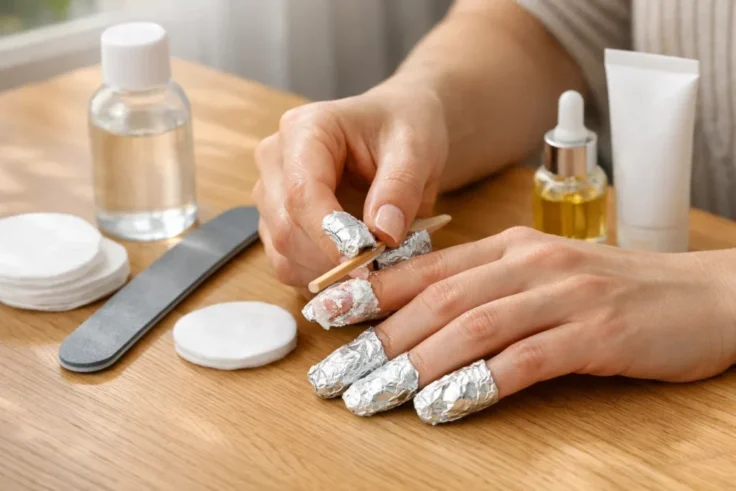
Step 4: Wrap Your Nails
Place a saturated cotton pad on each nail, then wrap the pad with a small piece of aluminum foil to hold it in place and trap the acetone’s fumes, which helps speed up the process. Make sure the foil wraps snugly around your fingertip. This is often called the “acetone wrap” method.
Step 5: Wait Patiently
Leave the foil wraps on for 15-20 minutes. This gives the acetone time to break down the gel polish layers. Resist the urge to check too early. If you’re using a lower-quality acetone or have particularly thick gel layers, you may need to wait closer to 20-25 minutes.
Step 6: Gently Remove the Polish
After waiting, carefully unwrap one foil packet and gently push at the edge of the gel polish with your cuticle pusher or orange stick. The polish should start to flake and lift away. If it’s still strongly adhered, wrap it back up for another 5 minutes. Never force the polish off—patience is key to avoiding nail damage.
Step 7: Clean Up
Once all the gel polish is removed, soak your nails in warm water for a few minutes to soften any remaining residue. Use your cuticle pusher gently to remove any stubborn bits. Your nails may look slightly discolored or feel rough—this is normal and will improve within days.
Step 8: Moisturize
After removal, apply cuticle oil and hand cream generously. Your nails and skin have been exposed to acetone, which is drying. Hydrating them immediately helps restore moisture and prevents peeling and cracking.
Tips for Success
Use enough acetone. Skimping on acetone will only prolong the process and increase frustration. The cotton pad needs to be fully saturated.
Don’t rush the process. Taking your time prevents damage. If the polish isn’t coming off easily after 20 minutes, wait a bit longer rather than forcing it.
Ensure good ventilation. Acetone has strong fumes. Open windows and work in a well-ventilated area to avoid breathing in too many fumes.
Protect your hands. If you have sensitive skin, consider wearing gloves or applying more protective cream. Some people prefer using acetone-soaked bowls instead of foil wraps, which allows for better control and less skin contact.
Give your nails a break. After removal, consider going a few days without polish or opting for regular (non-gel) polish. This gives your nails time to recover and regain their strength.
When to Seek Professional Help
If your nails are extremely damaged, very thin, or painful after removal, visit a professional. For detailed guidance on protecting your nail health and learning advanced removal techniques, check out our nail salon near me services, where we offer professional gel removal services that protect your natural nails.
If you frequently struggle with gel removal or prefer professional care, our experienced nail technicians can remove your gel polish safely and recommend a maintenance routine for healthy nails. Visit our Nail Salon in Champaign to book your appointment or learn more about our services.
Common Mistakes to Avoid
Picking or peeling the polish. This is the most damaging thing you can do. It removes layers of your nail along with the polish.
Using regular nail polish remover. It simply won’t work on gel polish and wastes time and money.
Filing too aggressively. You’re just trying to dull the surface, not sand down your nails.
Skipping the protective barrier. Your skin is delicate and acetone can cause chemical burns if applied directly.
Not moisturizing afterward. This is an essential step that many people skip, leading to dry, brittle nails.
Conclusion
Removing gel polish at home is entirely doable when you follow these steps carefully. The key is patience, proper materials, and gentle handling. By taking your time and protecting both your nails and skin, you can safely enjoy gel manicures without the damage that comes from improper removal. Your nails will thank you, and you’ll be ready for your next beautiful manicure in no time.
Leave feedback about this