
How to Weather-Proof Your Home: Proven Tips to Protect Against All Seasons
It starts with a subtle chill near the window frame or that creeping realization that your AC is running non-stop but the upstairs bedroom is still sweltering. For many homeowners, weather-proofing isn’t a priority until something feels wrong—or until the utility bill arrives.
But in 2025, with weather patterns becoming more unpredictable—from sudden polar vortexes in the South to record-breaking heatwaves in the Pacific Northwest—reactive maintenance isn’t enough. Weather-proofing is no longer just about slapping plastic on windows in November; it’s a year-round defense strategy for your biggest investment.
By taking a proactive approach, you aren’t just saving money on energy bills (though the savings can be substantial); you are extending the lifespan of your home’s structure and ensuring your family’s safety against the elements. This guide cuts through the noise to give you a practical, season-by-season roadmap to weather-proofing your home effectively.
What Does Weather-Proofing Your Home Really Mean?
When people hear “weather-proofing,” they often think of caulk guns and insulation rolls. While those are part of it, true weather-proofing is a holistic system. It is the process of protecting your home’s interior from exterior elements—moisture, wind, heat, and cold—while managing the indoor climate efficiently.
Unlike simple “weatherization,” which often focuses strictly on energy efficiency, weather-proofing includes structural defense. It’s about ensuring that a heavy storm doesn’t lead to water intrusion in your basement and that high humidity doesn’t rot your door frames.
Why It Matters More Now
Older homes (pre-1980s) are notorious for being “leaky,” but even new builds can suffer from poor sealing due to rushed construction. The long-term benefits are clear: lower energy consumption, reduced risk of mold and structural damage, and increased resale value. A well-sealed home is a tangible selling point in today’s market.
The Hidden Weather Leaks
Most homeowners ignore the “stack effect.” This is where air leaks in the basement suck cold air in, pushing warm air up and out through the attic. You might feel a draft in the living room, but the real hole is three floors up. Effective weather-proofing addresses the entire building envelope, not just the drafty window you sit next to.
Signs Your Home Is Not Properly Weather-Proofed
Your home will usually tell you when it’s struggling against the elements—you just have to know how to listen.
Drafts and Temperature Zones
Walk through your house barefoot. Do you feel cold spots on the floor? Is the hallway significantly cooler than the kitchen? Uneven indoor temperatures are a classic sign that your home’s envelope is compromised. If your HVAC system kicks on and off constantly (short-cycling), it’s fighting a losing battle against leaking air.
The Utility Bill Spike
Compare your bills to the same month last year. A sudden spike that can’t be explained by a rate increase or a new appliance usually indicates that your insulation or sealing has failed.
Moisture, Mold, and Condensation
In winter, check the inside of your windows. Excessive condensation means warm, moist indoor air is hitting a cold surface—a sign of poor window insulation. In summer, a musty smell in the basement or attic suggests humid outdoor air is infiltrating your space.
Exterior Warning Signs
Walk around the outside of your house. Peeling paint usually means moisture is getting into the siding and pushing the paint off from the inside out. Cracks in stucco or brickwork aren’t just cosmetic; they are open doors for water and wind.
Seasonal Weather-Proofing Strategy (Not One-Time Fix)
Treating weather-proofing as a “one-and-done” weekend project is a mistake. The materials that protect your home expand in summer heat and contract in winter cold, meaning maintenance is an ongoing cycle.
Summer & Heat Protection
The goal here is keeping heat out.
- Heat Blocking: Install solar screens or window films on south and west-facing windows to reflect UV rays without blocking the view.
- Ventilation: ensure your attic fans are working. A superheated attic (which can reach 150°F) acts like a radiator, pushing heat down into your living space.
- Air Sealing: It seems counterintuitive, but sealing leaks keeps expensive conditioned air inside.
Winter & Cold Protection
The goal shifts to heat retention and moisture management.
- Draft Sealing: Focus on door thresholds and window sashes.
- Pipe Insulation: Protect pipes in unheated spaces (garages, crawl spaces) to prevent freezing and bursting.
- Ice Dam Prevention: This starts in the attic. Proper insulation keeps the roof deck cold, preventing snow from melting and refreezing at the gutters.
Adopting a seasonal mindset aligns your home maintenance with the actual stresses your house faces, ensuring you aren’t fixing a draft when you should be worried about humidity.
How to Weather-Proof Windows and Doors Properly
Windows and doors are the weakest links in your home’s thermal envelope. In fact, the U.S. Department of Energy estimates that heat gain and heat loss through windows are responsible for 25%–30% of residential heating and cooling energy use.
Weatherstripping: The First Line of Defense
For doors, check the sweep at the bottom. If you can see daylight underneath your door, you’re losing money. Replace worn rubber sweeps with heavy-duty metal or vinyl ones. For windows, V-channel weatherstripping is highly effective for double-hung windows, creating a tight seal when the window is closed.
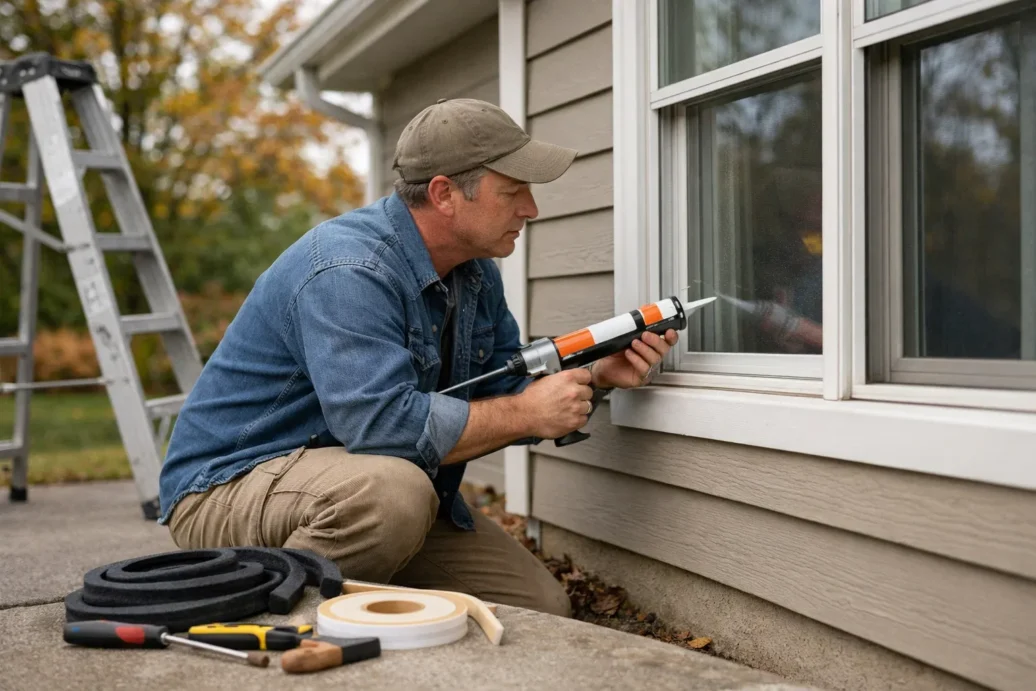
Caulking Mistakes to Avoid
Many DIYers make the mistake of caulking over old, cracked caulk. This won’t work. You must scrape out the old material, clean the surface, and apply fresh exterior-grade silicone or polyurethane caulk. Also, avoid caulking the “weep holes” at the bottom of exterior window frames—these are designed to let trapped moisture escape.
Storm Windows vs. Replacement
If you have single-pane windows but can’t afford a full replacement (which can cost $15,000+ for a whole house), modern low-emissivity (Low-E) storm windows are a fantastic middle ground. They cost a fraction of the price but provide similar thermal performance to double-pane windows.
Pro Tip: If you hold a lit candle near a window frame and the flame flickers, you have an active leak that needs immediate sealing.
Roof, Gutters, and Drainage – First Line of Defense
Your roof takes the biggest beating from the weather. Ignoring it is the fastest way to incur five-figure repair costs.
Roof Inspection Checklist
Twice a year, grab a pair of binoculars and scan your roof. You don’t always need to climb up there. Look for:
- Missing or curled shingles: These are entry points for wind-driven rain.
- Damaged flashing: Check the metal strips around chimneys and vent pipes. Rust or separation here is a major leak risk.
- Granule loss: If your gutters are full of sandy granules, your shingles are nearing the end of their life.
Gutter Slope & Blockages
Gutters must slope toward the downspout—about 1/4 inch for every 10 feet. If water pools in your gutters, it can freeze in winter, becoming heavy enough to rip the gutter off the fascia board. Ensure downspouts extend at least 5 feet away from your foundation to prevent basement flooding.
What Most Inspections Miss
Check the soffit vents (the vents under your roof overhang). Homeowners often accidentally paint over them or block them with insulation in the attic. Blocked soffits stop airflow, leading to ice dams in winter and roasted shingles in summer.
Insulation That Actually Makes a Difference
Insulation acts as a barrier to heat flow. It keeps your home warm in winter and cool in summer. But simply adding more “pink fluff” isn’t always the answer.
Understanding R-Value
R-value measures resistance to heat flow. The higher the R-value, the better the insulation.
- Attic: Needs the highest R-value (R-38 to R-60 depending on your climate zone).
- Walls: Typically R-13 to R-21.
- Basements/Crawlspaces: R-10 to R-19.
Climate-Based Choices
If you live in a humid southern climate, a vapor barrier is crucial to prevent mold growth inside walls. In colder northern climates, the focus is on maximizing R-value in the attic to prevent heat loss.
Attic, Wall, and Basement
Most homes have under-insulated attics. If you can see the floor joists in your attic, you likely need more insulation. Blown-in cellulose is a cost-effective DIY upgrade. For basements, focus on the “rim joist”—the wood framing that sits on top of your concrete foundation. Spray foam here seals large gaps that fiberglass batts simply can’t handle.
Foundation, Basement & Moisture Protection
Water is the enemy of a weather-proof home. Once moisture enters your foundation, it compromises air quality and structural integrity.
Dealing with Foundation Cracks
Hairline cracks are common as concrete settles, but any crack wider than 1/8 inch needs attention. Use hydraulic cement or an epoxy injection kit to seal these cracks effectively. This prevents water seepage during heavy rains and keeps soil gases like radon out.
Basement Humidity Control
Basements are naturally damp. Weather-proofing this space often means active moisture management. If your basement smells musty, you need a dehumidifier. Aim for a humidity level below 50% year-round.
Drainage Around the Home
The ground around your home should slope away from the foundation (a “positive grade”). If you have flower beds that trap water against the siding, you are inviting rot and termites. Regrading the soil is a cheap, labor-intensive fix that solves massive moisture problems.
The Cost Equation: Installing a $500 sump pump or spending $200 on regrading is infinitely cheaper than a $10,000 foundation repair or mold remediation job later.
Interior Weather-Proofing Most People Forget
While we focus on the exterior shell, massive air leaks happen right under our noses inside the house.
Electrical Outlet Drafts
Place your hand over an outlet on an exterior wall on a windy day. Feel that cold air? Outlets are essentially holes cut into your insulation. You can buy cheap foam gaskets that sit behind the faceplate to seal these leaks instantly.
Recessed Lighting (Can Lights)
Older recessed lights are like chimneys, venting warm air into your attic. If your lights aren’t “IC-rated” (Insulation Contact), you cannot pile insulation over them. The fix is to build airtight boxes over them in the attic or replace them with modern, sealed LED retrofit kits.
Fireplace Dampers
An open fireplace damper is like leaving a window wide open. Ensure the damper closes tightly. If it’s warped, install a chimney balloon or a top-sealing damper to stop the draft when the fireplace isn’t in use.
Pipe Penetrations
Look under your kitchen and bathroom sinks where pipes enter the wall. There are usually large, rough-cut gaps around the pipes. Fill these with expanding foam to stop air from the wall cavities entering your living space.
DIY vs. Professional Weather-Proofing – What’s Worth It?
Not every weather-proofing task requires a contractor, but knowing your limits is key to safety and effectiveness.
When DIY Works
- Caulking and Weatherstripping: Low risk, high reward.
- Draft Stopping: Installing foam gaskets, door sweeps, and window film.
- Basic Insulation: Rolling out fiberglass batts in an accessible attic is very doable for a handy homeowner.
When You Need a Pro
- Structural Repairs: If you find rotted sill plates or major foundation cracks, call a structural engineer.
- Roofing: Walking on a roof is dangerous. Leave shingle replacement and flashing repair to insured pros.
- Wall Insulation: Injecting foam or cellulose into finished walls requires specialized equipment and knowledge to avoid blowing out the drywall.
Trust Signal: Always hire licensed, bonded, and insured professionals for major work. A botched insulation job can lead to moisture trapping and black mold.
Cost Breakdown – How Much Does It Cost to Weather-Proof a Home?
Weather-proofing fits almost any budget, and the ROI is often immediate.
Low-Budget Fixes ($50 – $300)
- Tube of Caulk: $5–$10
- Weatherstripping: $10–$20 per roll
- Outlet Gaskets: $5 for a pack of 10
- Window Film Kit: $15 per window
- DIY Spray Foam (Cans): $8 per can
Mid-Range Upgrades ($500 – $2,000)
- Blown-In Attic Insulation: $1,000–$2,000 (DIY rental vs. Pro)
- Storm Doors: $300–$500 each
- Smart Thermostat: $150–$250 (helps manage climate efficiently)
- Professional Duct Sealing: $500–$1,500
Long-Term Investments ($5,000+)
- Window Replacement: $600–$1,200 per window
- Exterior Siding Replacement (with house wrap): $10,000–$20,000
- Roof Replacement: $8,000–$20,000
Transparency is key: While the investments can be high, energy audits often show that simple air sealing (the cheap stuff) provides the fastest payback period, often under a year.
Common Weather-Proofing Mistakes to Avoid
In the rush to seal up a home, it’s possible to go too far or use the wrong methods.
Over-Sealing (The “Tight House” Syndrome)
A house needs to breathe—but it needs to breathe correctly. If you seal an older home too tightly without adding mechanical ventilation (like an HRV or ERV system), you trap indoor pollutants, humidity, and CO2. If your windows sweat excessively after weather-proofing, you may have over-sealed.
Ignoring Ventilation
Blocking soffit vents with insulation is a classic blunder. Your attic needs airflow to keep the roof deck cool in winter and prevent moisture buildup. Never cover dedicated vents in your zeal to stop drafts.
Using the Wrong Caulk
Using interior latex caulk on exterior siding will fail within months. It washes away with rain. Always check the label: “Exterior,” “Silicone,” or “Elastomeric” are the keywords you want for outdoor use.
Skipping the Energy Audit
Many utility companies offer free or discounted energy audits. They use a “blower door test” to depressurize your house and find exactly where the leaks are. Skipping this is like trying to fix a tire puncture without finding the hole first.
FAQs – How to Weather-Proof Your Home
Is weather-proofing worth it?
Absolutely. The EPA estimates that homeowners can save an average of 15% on heating and cooling costs (or 11% on total energy costs) by air sealing their homes and adding insulation in attics, floors over crawl spaces, and basements.
How often should you weather-proof?
It’s an ongoing maintenance task. Inspect weatherstripping and caulk annually (preferably in the fall). Re-evaluate insulation every 10-15 years, as it can settle and lose effectiveness over time.
Can weather-proofing reduce energy bills?
Yes. By stopping conditioned air from escaping and outside air from entering, your HVAC system runs less often and for shorter periods, directly lowering your electricity or gas usage.
What’s the best time of year to start?
Ideally, late summer or early autumn is best for sealing and insulation work before the cold sets in. However, spring is perfect for inspecting winter damage to roofs and gutters.
Conclusion
Weather-proofing your home isn’t about battling nature; it’s about working with it to create a safer, more comfortable living space. Whether you are tackling a drafty door with a $10 strip of foam or investing in new attic insulation, every step counts.
In 2025, the smartest homeowners are the proactive ones. Don’t wait for the ice dam to form or the heatwave to peak. Start with the small, obvious leaks today. Your wallet—and your comfort level—will thank you when the next storm rolls in.


Leave feedback about this